The replacement HS rib arrived today, so I decided to go back and pick up where I left off on the HS. I was more careful this time about drilling the rib to the spars and it came out much better - even better than the left rib. After fitting the rib in place, I attached the skin, marked the holes on the inboard most ribs, fluted them, reinstalled them, and drilled them in place. I got a late start, so I had to stop here. No pictures - it's the same as the left side.
Today I received a shipment of used clecoes from Jim D. 200 each of 3/32" and 1/8". Timing couldn't have been better as most of mine are tied up on the rudder awaiting a new left skin.
Time spent: 1.5 hours (31.5 total)
Thursday, May 14, 2009


Deburred, dimpled, and countersunk VS
I've done all I can with the rudder until the new skin arrives, and I've done all I can with the HS until the replacement rib arrives (should be here tomorrow). Rather than starting the elevators, I decided to make some progress on the VS.
I started by using the old "soldering iron and a straight edge" trick to remove the vinyl from the rivet hole runs on the VS skin. This technique allows me to keep the protective plastic on as much of the skin as possible.
I deburred and then dimpled all of the holes (except for the holes that attach the fiberglass fairing). I used a hand squeezer on the edges and used the DRDT-2 on the inside holes.

Here's a shot of the DRDT-2. I don't have it bolted down yet, but this setup was good enough to dimple the VS skin. I'll probably have to build a workbench around it when I get to the wings. It's a really great tool. It saves me the trouble of swinging a mallet, it's much quieter than the average C-Frame, and it seems less likely to cause an "oops".

Once I was done with the skin, I deburred, dimpled, and countersunk the rear VS spar.
These holes had to be dimpled to install flush rivets:

These holes were countersunk to accept the dimpled skin. I seem to have enlarged the holes a little bit, but not so much that they are unusable. I just need to be careful when I squeeze these rivets.

When I was done with the rear spar, I worked on the rear spar reinforcement plate. I countersunk these holes to accept the dimpled holes in the spar.

To finish deburring this part I need to use the grinder and the Dremel. It's getting late and that would make too much noise, so I'll pick this up tomorrow.
Time spent: 3 hours (30 total)
I started by using the old "soldering iron and a straight edge" trick to remove the vinyl from the rivet hole runs on the VS skin. This technique allows me to keep the protective plastic on as much of the skin as possible.
I deburred and then dimpled all of the holes (except for the holes that attach the fiberglass fairing). I used a hand squeezer on the edges and used the DRDT-2 on the inside holes.

Here's a shot of the DRDT-2. I don't have it bolted down yet, but this setup was good enough to dimple the VS skin. I'll probably have to build a workbench around it when I get to the wings. It's a really great tool. It saves me the trouble of swinging a mallet, it's much quieter than the average C-Frame, and it seems less likely to cause an "oops".

Once I was done with the skin, I deburred, dimpled, and countersunk the rear VS spar.
These holes had to be dimpled to install flush rivets:

These holes were countersunk to accept the dimpled skin. I seem to have enlarged the holes a little bit, but not so much that they are unusable. I just need to be careful when I squeeze these rivets.

When I was done with the rear spar, I worked on the rear spar reinforcement plate. I countersunk these holes to accept the dimpled holes in the spar.

To finish deburring this part I need to use the grinder and the Dremel. It's getting late and that would make too much noise, so I'll pick this up tomorrow.
Time spent: 3 hours (30 total)
Tuesday, May 12, 2009
Rudder skeleton
Assembled the rudder skeleton. Clecoed the counterbalance skin in place, clecoed the right rudder stiffeners back on the right skin, and clecoed the right skin in place.


Final drilled all of the holes I could. Trimmed and attached the angular brace at the bottom forward corner of the rudder. Final drilled the brace to the structure.

Joe from Van's read my email regarding the defect in the left rudder skin, and he also saw my post on VAF. He is sending me a new skin. I will put the rudder assembly aside as is (soon I should have enough clecoes to spare these) and pick this up when the new skin comes.
Time spent: 2 hours (27 total)


Final drilled all of the holes I could. Trimmed and attached the angular brace at the bottom forward corner of the rudder. Final drilled the brace to the structure.

Joe from Van's read my email regarding the defect in the left rudder skin, and he also saw my post on VAF. He is sending me a new skin. I will put the rudder assembly aside as is (soon I should have enough clecoes to spare these) and pick this up when the new skin comes.
Time spent: 2 hours (27 total)
Monday, May 11, 2009
Rudder skin defect
Called Van's today and spoke with a tech counselor. He was surprised to hear that I have just one hole out of alignment - usually it's an entire pattern. He suggested that I abandon this hole and drill two new holes on either side of the bad hole. Later I can use proseal to fill in the bad hole. I'm not sure if I want to go that route or see if Van's will ship me a new skin. I posted a thread on VAF to get some feedback on the situation. No work on the plane tonight.
Sunday, May 10, 2009
Rudder stiffeners, found a defect
I finished fabricating the rudder stiffeners. Each stiffener had to be trimmed to length. As you go from bottom to top, each stiffener is shorter than the next. I used the tin snips to trim, and used the scotch brite wheel to round the edges and debur. Here are the stiffeners laid out on the left rudder skin:

I match drilled the stiffeners to the right skin and put everything aside, making sure to bundle and mark the right stiffeners so they do not get mixed up with the left ones.
I started match drilling the left skin to the stiffeners when I encountered the following prepunched hole pattern:

You can see clearly that the hole near the 7" mark on the ruler is out of alignment. Here is a shot from the other side:

Unfortunately this is a blocking issue. The hole in the skin does not line up with the hole in the stiffener. I sent an email to Van's with a detailed description of the problem. I am hoping they will send me a new skin with the correct hole pattern. It looks like I'll have to put the left rudder skin aside for now pending what I hear from Van's.
I can try to move on to the rudder skeleton, and my replacement rib for the HS should arrive this week, so I should be able to get back to that.
Time spent: 2 hours (25 total)

I match drilled the stiffeners to the right skin and put everything aside, making sure to bundle and mark the right stiffeners so they do not get mixed up with the left ones.
I started match drilling the left skin to the stiffeners when I encountered the following prepunched hole pattern:
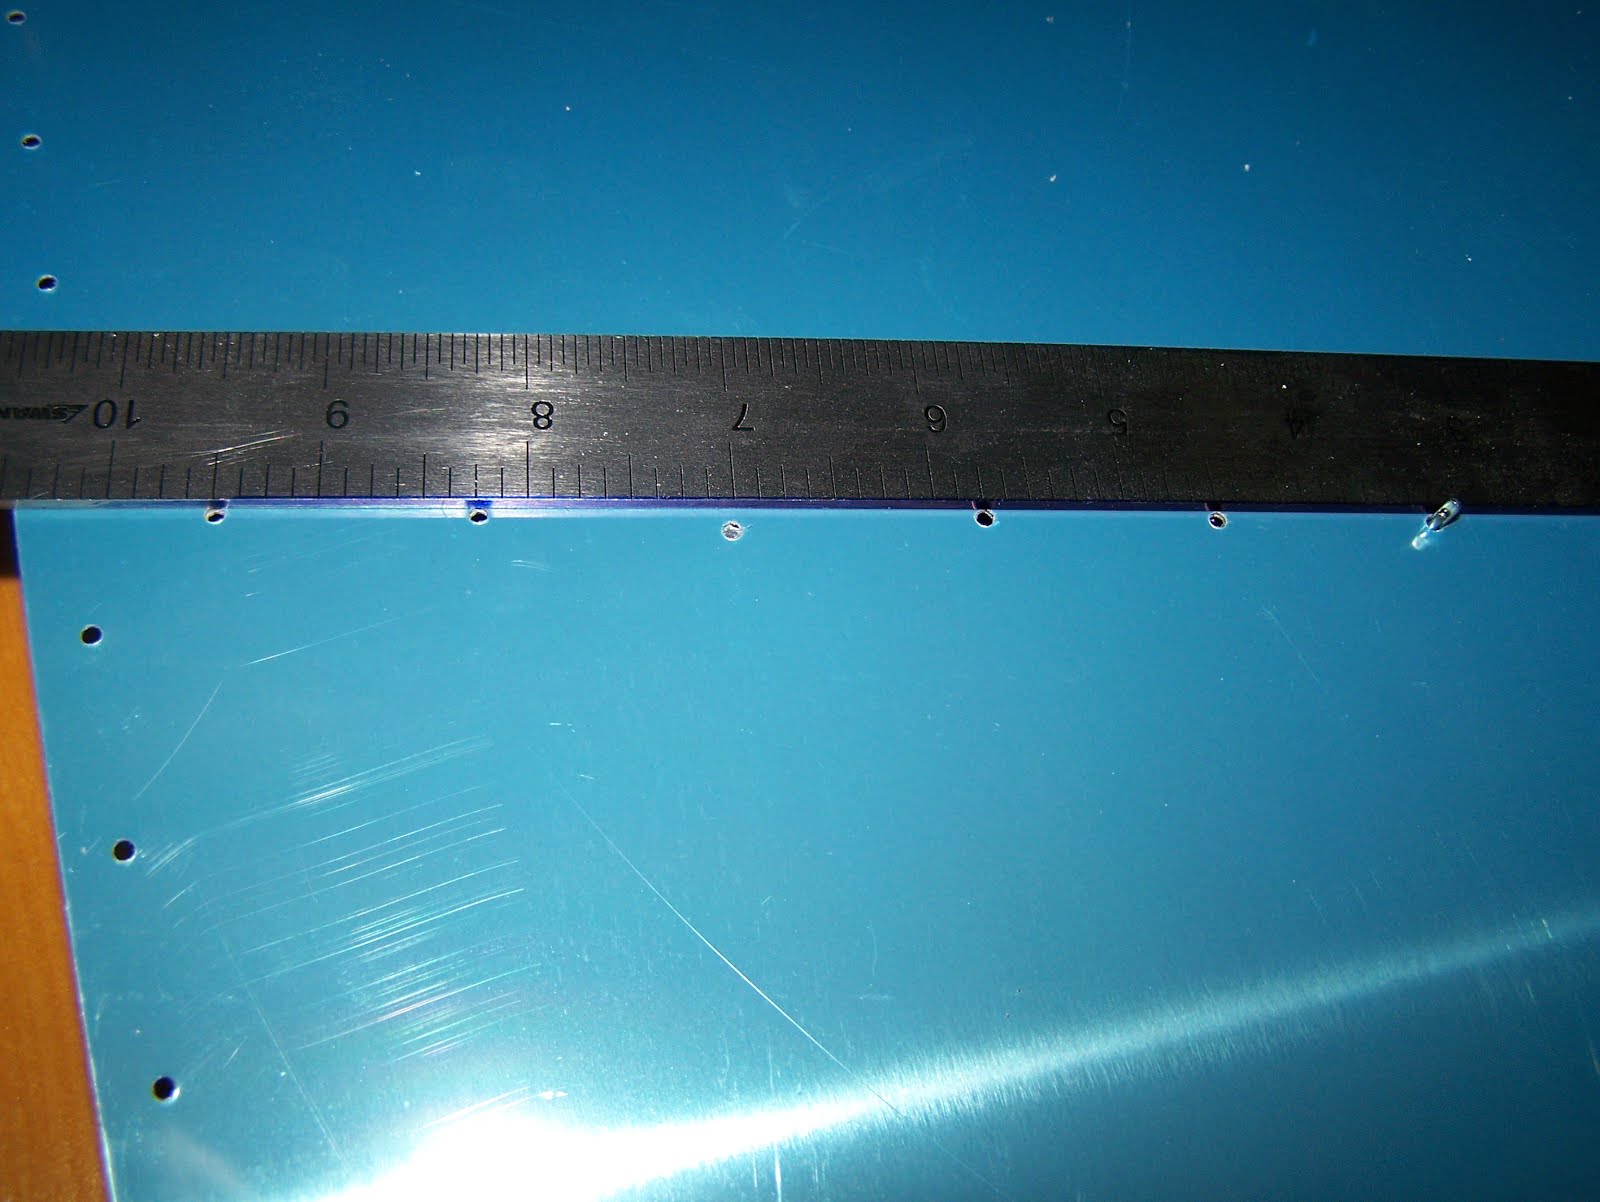
You can see clearly that the hole near the 7" mark on the ruler is out of alignment. Here is a shot from the other side:

Unfortunately this is a blocking issue. The hole in the skin does not line up with the hole in the stiffener. I sent an email to Van's with a detailed description of the problem. I am hoping they will send me a new skin with the correct hole pattern. It looks like I'll have to put the left rudder skin aside for now pending what I hear from Van's.
I can try to move on to the rudder skeleton, and my replacement rib for the HS should arrive this week, so I should be able to get back to that.
Time spent: 2 hours (25 total)
Saturday, May 9, 2009
Finished tapering rudder stiffeners
Finished tapering the rudder stiffeners. Placed the stiffeners on the rudder skins. The forward side of the stiffeners need to be trimmed to length.
Time spent: 30 min (23 hours total)
Time spent: 30 min (23 hours total)
Friday, May 8, 2009
Match drilled VS, cut rudder stiffeners
I match drilled the VS, disassembled it, and put it aside. I will debur, dimple, and countersink the parts along with everything else.
Began cutting the rudder stiffeners. There are 16 in all (8 pieces cut in half) and the ends closest to the rudder's trailing edge need to be tapered.
Time spent: 2 hours (22.5 total)
Began cutting the rudder stiffeners. There are 16 in all (8 pieces cut in half) and the ends closest to the rudder's trailing edge need to be tapered.
Time spent: 2 hours (22.5 total)
Subscribe to:
Posts (Atom)